How To Create A WordPres Staging Site For Testing – 3 Best Method
- Get link
- X
- Other Apps
How To Create Aa WordPress Staging Site For Testing – 3 Best Method use
7 Things to Know Before Updating to WordPress 5
' ); h3_html = ''+cat_head_params.sponsor.headline+''; cta = ''+cat_head_params.cta_text.text+'→' atext = '
'+cat_head_params.sponsor_text+'
'; scdetails = scheader.getElementsByClassName( 'scdetails' ); sappendHtml( scdetails[0], h3_html ); sappendHtml( scdetails[0], atext ); sappendHtml( scdetails[0], cta ); // logo sappendHtml( scheader, '' ); sc_logo = scheader.getElementsByClassName( 'sc-logo' ); logo_html = '
ADVERTISEMENT
' ); if("undefined"!=typeof __gaTracker){ __gaTracker('create', 'UA-1465708-12', 'auto', 'tkTracker'); __gaTracker('tkTracker.set', 'dimension1', window.location.href ); __gaTracker('tkTracker.set', 'dimension2', 'web-development' ); __gaTracker('tkTracker.set', 'contentGroup1', 'web-development' ); __gaTracker('tkTracker.send', { 'hitType': 'pageview', 'page': cat_head_params.logo_url, 'title': cat_head_params.sponsor.headline, 'sessionControl': 'start' }); slinks = scheader.getElementsByTagName( "a" ); sadd_event( slinks, 'click', spons_track ); } } // endif cat_head_params.sponsor_logo
It’s been less than a week since WordPress 5 has been released. Anecdotal reports indicate there are many successful upgrades. But I am also aware of many sites that have experienced issues. After looking at these issues, I discovered seven things that may help a smooth update.
PHP is the scripting language that powers WordPress and all the themes and plugins associated with WordPress. Using an outdated version could cause conflicts that result in a buggy experience.
Most plugins, themes and WordPress itself will run with a minimum of PHP 5.6 as they are backward compatible. But you can’t count on software to be backward compatible.
The best approach is to use the version of PHP that a software is designed to run best with. That way you can rule out a random bug related to using an old version of PHP.
Upgrading to the latest PHP will speed up your site.
It is also more secure. Security updates for PHP 5.6 are ending in December. That means PHP 5.6 will become a security liability.
2. Update Plugins
Updating plugins is always a good practice. However it is especially important now. Many WordPress plugin authors are currently releasing new versions that will be compatible with WordPress 5.
Updating your plugins first contributes to a more bug free update to WordPress 5.
3. Use the Classic WordPress Editor or Gutenberg?
If you like the way WordPress currently works, choose the Classic Editor. If you want to try the new and reportedly easier Gutenberg editing experience then go with that.
I’ve read reports here and there of random bugs when using the Gutenberg editor.
You can always revert back to the Classic Editor if the Gutenberg editor is misbehaving. Downloading the official WordPress Classic Editor plugin seems to have solved issues of the few bug reports I’ve seen related to Gutenberg.
4. Create a Back Up of Your WordPress Site
Creating a back up is always a good idea. Ideally, you should already be doing this. But if you’re not, then consider creating a back up of your site before upgrading to WordPress 5.0.
A user reported success using UpdraftPlus Backup Plugin as part of their WordPress 5 upgrade:
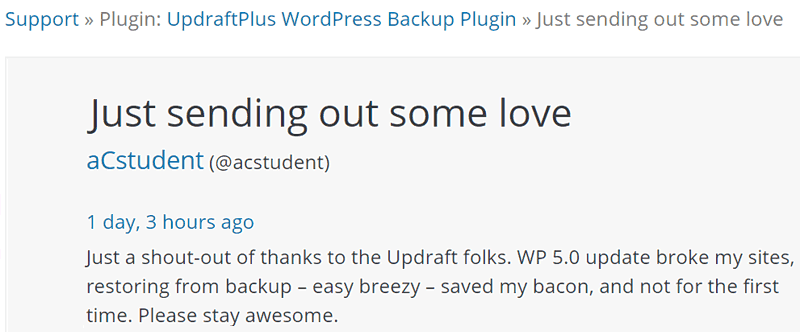
I have successfully used UpDraftPlus WordPress Backup Plugin in the past. It has been useful as part of my backup management. I can recommend it for ease of use and functionality. I have also used it to successfully restore websites.
UpDraftPlus comes in a fully functional free version and a premium version that has more options.
5. Decide Whether to Stage the Site
Staging a site means creating a copy of your site and making the changes on the copy first. There are plugins to help you stage a site and there are services that will host your staged site on their servers, thereby keeping the changes completely separate from your website. Alternatively you can stage the site on your desktop.
Stage on a Test Server
Staging a site on someone else’s server is in my opinion the ideal solution. Changes made on the copy will not slow down your website.
The staged website is hidden and no search engine will ever see it. All changes can be made with the confidence that they will not affect your real website.
I have successfully used WP Stagecoach for staging and redesigning an entire WordPress website and can recommend it with confidence.
WP Stagecoach is easy to use. The user interface is intuitive. If you want a no-brainer approach to staging and testing a WordPress website, WP Stagecoach is a solid choice.
It is a paid service but the modest cost is well worth the price for being able to test an upgrade.
Stage a Site with a Plugin
I have successfully used a free plugin for staging a site as well. The name of the plugin is called WP Staging.
My motivation for using that plugin was to try something new and I was very satisfied with the results.
A staging plugin creates a hidden folder on your host. The duplicate site is staged in that folder. There is no way for the site to be viewed other than by you. All changes are kept separate from the real site.
When you’re ready to upgrade you can press a button and move the entire site to the real site from the staged site.
Stage a Site on Your Desktop
Many experts recommend a local staging environment called Laragon. I haven’t used Laragon. However, Laragon comes highly recommended by experts that I know and trust. Best of all it is free.
6. Caching Plugins
I have received reports about conflicts that may be related to caching and performance related plugins. Should you observe buggy behavior that is not solved by using the Classic Editor, you may consider emptying your cache and minifying all JavaScript.
This might not be considered a bug, because emptying your cache and minifying all your scripts is recommended every time a plugin, theme or WordPress itself is updated.
7. Don’t be Afraid to Update – Be Prepared
Updating to the latest version of WordPress can seem like a scary proposition, especially this close to the busy holiday shopping season.
There are good reasons to be wary about updating WordPress. This is a major decision to make. Thus it is helpful to approach the update with a thoughtful plan. Being prepared with knowledge of common bugs such as caching plugin issues and how to fall back to the classic editor can help smooth your path. Additionally, staging your website first is a smart consideration before undertaking the upgrade.
So rather than be afraid, take matters into your own hands and approach the project with preparation in order to assure the best possible outcome.
More Resources
Images by Shutterstock, Modified by AuthorScreenshots by Author, Modified by Author
02
If you modify your original (parent) theme directly and it is then updated, your modifications may be lost. By using a child theme you will ensure that your modifications are preserved
Modifications to an original (parent) theme may break the code, rendering the site broken
Using a child theme can speed up design & development time. (We will go into more detail how further on)
Using a child theme is a great way to learn about WordPress design & development in particular customising the CSS (Cascading Style Sheet)
Functions.php file for linking the Divi child theme to your parent Divi theme
style.css file to add your own CSS for customising your website design
Screenshot.png which is an image for showing the child theme within the installed WordPress theme library
Header.php file for adding any customisation to your website header elements
Login Editor so you can edit the WordPress Login page with a relevant logo & text
Creating a child theme folder
Create a style.css file with the relevant child theme info
Creating a functions.php file and adding the required code to en-queue the parent theme. In this instance Divi.
A screenshot.jpg file for displaying child theme logo.
/* — — — — — — — — — — — — — — — — — — — — — — — — — — — — — — — — — — — — — — — — -
Theme Name: My Divi Child Theme
Theme URI: http://www.mysite.com
Description: A Divi Child Theme
Author: My Name
Author URI: http://www.mysite.com
Template: Divi
Version: 1.0.0
— — — — — — — — — — — — — — — ADDITIONAL CSS HERE — — — — — — — — — — — — — — — */
<?php
/**
* @author Resilient Digital
* @copyright 2017
*/
if (!defined(‘ABSPATH’)) die();
function ds_ct_enqueue_parent() { wp_enqueue_style( ‘parent-style’, get_template_directory_uri() . ‘/style.css’ ); }
function ds_ct_loadjs() {
wp_enqueue_script( ‘ds-theme-script’, get_stylesheet_directory_uri() . ‘/ds-script.js’,
array( ‘jquery’ )
);
}
?>
How To Create A WordPress Child Theme For Divi
The excitement of designing your very own website is un-paralleled and the sense of achievement is high…until you update your WordPress theme.
Next thing you know your design & layouts have changed or look considerably different to before.
So you perhaps start searching for answers and then you find out about these things called WordPress child themes!
But your probably wondering:
What the heck is a child theme?
Well to put is simply, a child theme is core theme that inherits the styling & functionality of your original theme (parent theme).
Child themes are therefore recommended for customisation of your original theme.
Exactly why is it recommended?
Well…
The core reasons for using a child theme are:
For new web designers, getting your head around using a child theme may seem daunting.
There’s good news though!
Once you have created your first one and have it functioning as it should, it will easily become normal practise.
Our web design agency uses the Divi theme from Elegant Themes for every client website and our very first step is to upload our standard Divi Child Theme.
So what steps do you need to take for creating a child theme?
As it turns out:
We have 3 different methods for you to choose.
For those using the Divi theme, you can choose from any of the following methods. Everyone else not using Divi can follow method #2 or method #3 and follow the recommended steps to suit the parent theme your using.
Ok so if you’re using Divi and you would like to upload a child theme the standard way but without having to produce the files, then follow this first method.
1. Download Our Custom Divi Child Theme
Our custom Divi child theme is simply a zip file which you will upload the same way as you would your original parent theme.
Download Our Divi Child Theme Zip File
VISIT ORIGINAL POST HERE TO DOWNLOAD!
It contains the required:
Plus additionally:
When you download the zip file, you can simply upload that straight into your themes dashboard & activate it.
Upon activation, your website should look exactly the same.
You will notice the change in footer elements that should replicate your Site Title.
You now have the ability to add custom CSS to the style.css file inside of the child theme editor or via FTP.
To edit the login page, simply head to the Divi Theme Customiser ( Divi > Theme Customiser > Login Editor ) and select the login editor button.
So that is a pretty straight forward method for installing & activating a Divi child themethat has options for customising not only the CSS styling, but also your Divi Header & Dashboard Login.
2. Using A Plugin
If you’re not fussed on editing the Header & Footer of your site, then we suggest using this simple plugin Child Theme Configurator from the WordPress depository.
Best of all…
Uploading the plugin will quickly allow you to setup a Divi child theme.
Child Theme Configurator is a fast and easy to use utility that allows you to analyse any theme for common problems, create a child theme and customise it beyond the options of the Customiser.
Designed for WordPress users who want to be able to customise child theme stylesheets directly, Child Theme Configurator lets you easily identify and override the exact CSS attributes you want to customise.
3. Manually Creating Your Own (Full Tutorial)
In this tutorial, I will be creating a child theme for the Divi theme. Of course the same process applies for any theme you’re working with. We just use Divi on 99% of our projects.
The steps are relatively easy and you will have a good understanding of how a child theme is structured to increase your web development knowledge.
The process will involve:
Alright so let’s dive in…
First of all anywhere on your desktop, create a new folder & name it “divi-child”
Step 1 done!
Now we need to create a style.css file
There are two ways we can go about this.
For users with experience using source code editors, we prefer to use a software program called Brackets.
As we build our projects using a Mac, we find Brackets works really well.
For those with zero experience using software programs such as Brackets, then I suggest using a standard TextEdit (Mac) or TextEditor (Windows).
All options will get the desired result.
Ok so with your code / text editor open, we need to create a style.css file.
Copy & paste the code below into the code / text editor.
Once pasted in…
Go ahead & change out the theme name and author information based on your details.
There is one important note to point out!!
The Template name must be the parent theme name. In this instance it will be remain “Divi”.
Ok so once you have those details changed, you can save as style.css
Move this file inside of the “divi-child” folder we created in step 1
Step 2 done!
To en-queue the parent theme, we need to create a function.php file & add in a particular line of code.
So go ahead & open a new file inside of your code / text editor.
Copy & paste in the code below
Once you have done this, all you need to do is save as functions.php
Once saved, move this file inside of the divi-child folder as well.
Ok so that’s step 3 finished.
Moving ahead now!
To show a logo or image of your child theme in the theme directory, we need to add a screenshot.jpg file preferably 800px wide by 600px high.
So have a logo or image created similar to our below using those dimensions and save as screenshot.jpg
Once saved, also move this file inside of the divi-child folder.
And that is step 4 done.
Your Divi-Child folder should look like this:
All that’s left to do is to compress the divi-child folder into a .zip file and upload into your themes directory within WordPress, then activate it.
Compressing divi-child folder & uploading into WordPress.
So using a Mac, I simply Control + Click on the divi-child folder then click on compress.
The Mac then displays a divi-child.zip file
With the relevant style.css file, functions.php file, screenshot.jpg file inside of the divi-child.zipfile you now have a child theme ready to upload into WordPress just like any other parent theme.
So with a parent Divi theme installed & activated, go ahead and upload your Divi-Child.zip file.
After installation is complete, activate the child theme and you now have a website running Divi as the framework using a Divi child theme for customisation purposes.
Conclusion
So there you go… 3 ways to implement a child theme for your website.
Now in case you are wondering, Yes a child theme can be installed and activated on a live / exisiting website already in use.
You will just need to make a note of any customisation changes you have made to the parent theme (things like menu structure, fonts, custom CSS etc) so you can apply those to the child theme.
I also recommend installing a child theme on an exisiting website under a staging environment.
Depending on your host, setting up staging environments can be done within your Cpanel or you can use a plugin.
Elegant Themes has an in-depth tutorial on creating a WordPress staging site for development & testing.
Now I’d like to hear what you think:
Let me know what method your going to try.
Ready to create your own child theme files?
Or maybe you will opt into our own child theme download.
Either way, leave a comment below right now!
This article https://www.resilientdigital.com.au/create-wordpress-child-theme-divi/ was first featured on the Resilient Digital SEO & Web Design Blog
03

The Beginner’s Guide to Website Staging
This article is part of a series created in partnership with SiteGround. Thank you for supporting the partners who make SitePoint possible.
Are you thinking of making changes to your site? Perhaps an update or a redesign?
Before you jump in head first, you should know there is a quicker and safer way to do that.
Enter website staging.
A handful of hosting companies offer website staging to their clients and this article aims to unveil all the greatness that is website staging and why they are a game changer for not only designers and developers, but everyday site owners.
What is Website Staging?
A staging site is essentially a clone of your website that is actually independent from your live site that visitors can see. It has the same settings, same software, and same hardware as your live site but is safely placed in a staging area while you work on it. This staging area can be thought of as a sandbox or demo site that can be altered for any purpose while having no effect on your live site.
When you are satisfied with the changes you have made, then this clone site can be pushed live with the click of a button at any time. The staged site will essentially overwrite or become your live site.
Why is Website Staging Important?
Website staging is a key feature in any great hosting package because it allows you to make changes to your website without interrupting your live site. This means no downtime while making changes, so you can keep on engaging your readers and selling products. This also means you won’t take a hit on your SEO ranking because search engines won’t be indexing the staging copy of your site.
Website staging is important not just to keep your site operational at all times but also to test out site changes before making them live. Installing a new plugin or theme? That’s a perfect time to test it on a staging site. Making routine updates to your WordPress themes or plugins? Another great scenario to use a cloned site. Making a staging site a part of your website maintenance schedule is definitely a best practice that will pay dividends in the long run. It will prevent downtime from faulty plugins or theme updates being incompatible with your unique site features.
Another key feature of website staging is the ability to do site redesigns on the fly without any site interruption. You or your designer can create a quick clone of the site in the staging area and make all the necessary changes without having to go through the arduous process of downloading all the files, plugins, themes, etc. and setting them up on a new site. That process can take hours. With a staging site, you are making changes in a matter of minutes. Once everything is complete, and you’re satisfied that the changes look good and function properly you can simply click a button and push that site live for your customers to see.
How Can You Use Website Staging?
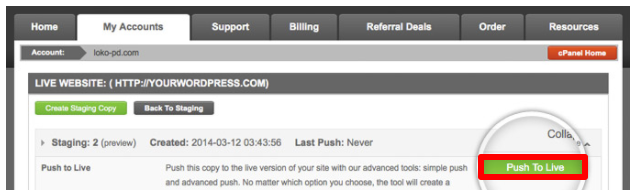
While the exact staging process may differ with each hosting provider, you can rest assured they all work in a similar fashion. Here’s a breakdown of the standard step-by-step process of website staging:
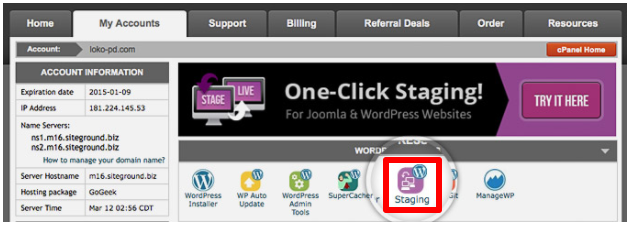
1. Navigate to your cPanel or WordPress dashboard where you will find an option for ‘Staging’.
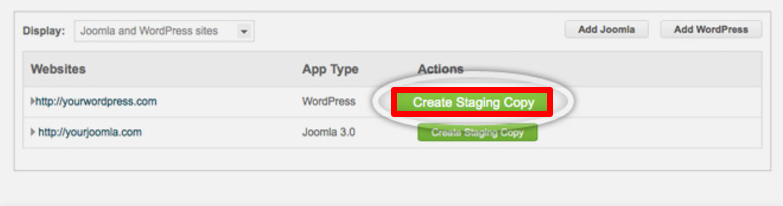
2. Create your staging site by selecting the website you wish to copy and select the option to stage which may read as “Create Staging Copy” or some other variety.
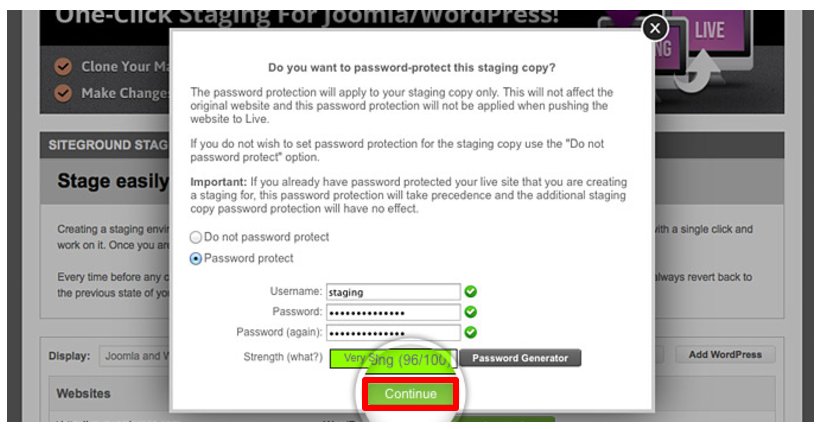
3. Select if you want to password protect this cloned site in your staging environment. This matters because if you don’t do this, Google and other search engines will start indexing the staging copy and can show your site visitors and unfinished site. The indexing of an unfinished site can also negatively affect your SEO.
4. Make your changes by clicking on the link or button provided by your hosting provider which will take you to this staging site you’ve just created. Usually, your website’s URL will read normally except it will have a string on the front to signify it is a staging environment. As an example, it might read “staging1.website.com”. Now you are safe to download any new themes, plugins, or just simply update your existing features.
5. Push the staging site live. This process will essentially overwrite your current site and let all your site visitors see your new site with all the changes you just made. Some hosting companies will offer an ‘advanced’ push to live option which will allow you to basically soft test the new changes without overwriting and erasing you previous site forever. This way you don’t break your site with incompatible changes and updates. As a workaround if your hosting company doesn’t have this option, you can restore a backup version of the site to fix it.
That’s it! You can’t make it much simpler than that. If you run into any unknown prompts or messages along the way, we would suggest simply typing your hosting providers name into any search engine followed by the word “staging” to find detailed instructions on how to proceed.
If your site is small, this entire process can take a matter of minutes; especially if you are only updating plugins or performing routine maintenance. If you have a large site and are doing redesign work, then the process can take considerably longer for creating cloned site, making changes, and pushing to live.
Summary
Does your hosting company offer website staging?
Is so, then days of ‘cowboy coding’ on a live site and hoping everything works out are over. Now that you know the basics of website staging, you can venture into major website changes and routine site maintenance with confidence.
If your hosting company doesn’t offer website staging, then it might be time to shop around. Our partner, SiteGround, offers free website migration and includes staging environments in all hosting plans. Their WordPress staging feature makes a copy of your live website in case you need to restore it. All SiteGround hosting plans now come with up to 65% off for SitePoint users.
Do you have any questions about staging or helpful stories to share about your staging experience? Please share them in the comments below.
- Get link
- X
- Other Apps

Comments
Post a Comment